Thursday, October 2, 2025

Eventloop, micro macrotasks, promise async await,ui performance, debug

JavaScript Interview Questions Answers

1. What is Event Loop?

Answer:

"The Event Loop is a mechanism in JavaScript that handles asynchronous operations even though JavaScript is single-threaded. It continuously checks if the call stack is empty, and if it is, it moves tasks from the task queues to the call stack for execution.

Let me explain with an example:

console.log('First');

setTimeout(() => {
  console.log('Second');
}, 0);

console.log('Third');

// Output: First, Third, Second

Here's what happens:

  1. JavaScript executes synchronous code first - so 'First' and 'Third' print immediately
  2. The setTimeout is sent to Web APIs, even with 0ms delay
  3. After the callback is ready, it goes to the callback queue
  4. The Event Loop checks: "Is call stack empty?" If yes, it moves the callback from queue to call stack
  5. Then 'Second' prints

The Event Loop ensures non-blocking operations - so our application doesn't freeze while waiting for data from APIs, timers, or file operations."

Follow-up points:

  • "The Event Loop has a priority system - it checks microtask queue before macrotask queue"
  • "This allows JavaScript to handle multiple operations without blocking the main thread"

2. What are the differences between Macrotask and Microtask queues?

Answer:

"In the Event Loop, there are two types of queues with different priorities - Microtask Queue and Macrotask Queue.

Microtask Queue (Higher Priority):

  • Contains: Promise callbacks (.then, .catch, .finally), async/await, queueMicrotask()
  • Executes: ALL microtasks are executed before moving to the next macrotask
  • Priority: High - executes first

Macrotask Queue (Lower Priority):

  • Contains: setTimeout, setInterval, setImmediate, I/O operations, UI rendering
  • Executes: ONE macrotask at a time, then checks microtask queue again
  • Priority: Low - executes after all microtasks

Here's a practical example:

console.log('1 - Sync');

setTimeout(() => {
  console.log('2 - Macrotask (setTimeout)');
}, 0);

Promise.resolve().then(() => {
  console.log('3 - Microtask (Promise)');
});

console.log('4 - Sync');

// Output:
// 1 - Sync
// 4 - Sync
// 3 - Microtask (Promise)
// 2 - Macrotask (setTimeout)

Execution Order:

  1. All synchronous code first (1, 4)
  2. All microtasks (3)
  3. One macrotask (2)
  4. Check microtasks again (if any)
  5. Next macrotask... and so on

Key Difference: Microtasks always execute before the next macrotask, which is why Promises execute before setTimeout even when both are ready."


3. Differences between MAP, FILTER, and REDUCE methods

Answer:

"MAP, FILTER, and REDUCE are array methods that help process data without mutating the original array. Each serves a different purpose:

MAP - Transforms Each Element

Purpose: Creates a new array by transforming each element

const numbers = [1, 2, 3, 4];
const doubled = numbers.map(num => num * 2);
console.log(doubled); // [2, 4, 6, 8]
  • Returns: New array with same length as original
  • Use case: When you need to transform or modify each element
  • Example: Converting prices from dollars to rupees, extracting specific properties from objects

FILTER - Selects Specific Elements

Purpose: Creates a new array with elements that pass a condition

const numbers = [1, 2, 3, 4, 5, 6];
const evenNumbers = numbers.filter(num => num % 2 === 0);
console.log(evenNumbers); // [2, 4, 6]
  • Returns: New array with fewer or equal elements
  • Use case: When you need to select/filter elements based on condition
  • Example: Getting active users, filtering products by price range

REDUCE - Combines into Single Value

Purpose: Reduces array to a single value by accumulating results

const numbers = [1, 2, 3, 4];
const sum = numbers.reduce((accumulator, current) => {
  return accumulator + current;
}, 0);
console.log(sum); // 10
  • Returns: Single value (can be number, object, array, etc.)
  • Use case: When you need to calculate totals, combine data
  • Example: Calculating cart total, finding max value, grouping data

Comparison Table:

Method Returns Length Purpose
MAP New array Same as original Transform each element
FILTER New array Same or less Select elements by condition
REDUCE Single value N/A Combine/accumulate into one value

Real-World Example:

const products = [
  { name: 'Laptop', price: 1000, inStock: true },
  { name: 'Phone', price: 500, inStock: false },
  { name: 'Tablet', price: 300, inStock: true }
];

// FILTER: Get only in-stock products
const availableProducts = products.filter(p => p.inStock);
// [Laptop, Tablet]

// MAP: Get just the names
const productNames = products.map(p => p.name);
// ['Laptop', 'Phone', 'Tablet']

// REDUCE: Calculate total price of in-stock items
const totalValue = products
  .filter(p => p.inStock)
  .reduce((total, p) => total + p.price, 0);
// 1300

Key Point: All three methods are immutable - they don't change the original array, which is important for writing predictable, bug-free code."


4. How are Promises and Async/Await different? When to use Async/Await over Promises?

Answer:

"Promises and Async/Await are both used for handling asynchronous operations, but Async/Await is basically syntactic sugar built on top of Promises to make code more readable.

Promises (Traditional Approach)

function fetchUserData() {
  fetch('https://api.example.com/user/1')
    .then(response => response.json())
    .then(user => {
      console.log(user.name);
      return fetch(`https://api.example.com/posts/${user.id}`);
    })
    .then(response => response.json())
    .then(posts => {
      console.log(posts);
    })
    .catch(error => {
      console.error('Error:', error);
    });
}

Issues with Promises:

  • Chain of .then() can become nested (callback hell)
  • Harder to read when multiple operations
  • Error handling with .catch() for entire chain
  • Difficult to use with loops or conditionals

Async/Await (Modern Approach)

async function fetchUserData() {
  try {
    const response = await fetch('https://api.example.com/user/1');
    const user = await response.json();
    console.log(user.name);
    
    const postsResponse = await fetch(`https://api.example.com/posts/${user.id}`);
    const posts = await postsResponse.json();
    console.log(posts);
  } catch (error) {
    console.error('Error:', error);
  }
}

Advantages of Async/Await:

  • Looks like synchronous code - easier to read
  • Better error handling with try/catch
  • Easier to debug (can set breakpoints on each line)
  • Works well with loops and conditionals
  • No .then() chaining

Key Differences:

Aspect Promises Async/Await
Syntax .then().catch() chaining try/catch with await
Readability Can get messy with multiple chains Clean, sequential code
Error Handling .catch() for entire chain try/catch for specific blocks
Debugging Harder to debug chains Easier - line-by-line debugging
Conditional Logic Difficult Easy

When to Use Async/Await Over Promises:

Use Async/Await when:

  1. Sequential operations where each depends on previous:
async function processOrder() {
  const order = await createOrder();
  const payment = await processPayment(order.id);
  const shipping = await arrangeShipping(payment.id);
  return shipping;
}
  1. Complex conditional logic:
async function getUser(id) {
  const user = await fetchUser(id);
  
  if (user.isPremium) {
    return await fetchPremiumData(user.id);
  } else {
    return await fetchBasicData(user.id);
  }
}
  1. Error handling for specific operations:
async function saveData() {
  try {
    const validated = await validateData(data);
    await saveToDatabase(validated);
    console.log('Saved successfully');
  } catch (error) {
    console.error('Validation or save failed:', error);
  }
}
  1. Using with loops:
async function processItems(items) {
  for (const item of items) {
    await processItem(item); // Wait for each to complete
  }
}

Use Promises when:

  1. Parallel operations (use Promise.all):
// Fetch multiple things at once
Promise.all([
  fetch('/api/users'),
  fetch('/api/products'),
  fetch('/api/orders')
])
.then(([users, products, orders]) => {
  // All done together
});
  1. Fire and forget (don't need to wait):
saveAnalytics(data).then(() => console.log('Logged'));
// Continue without waiting

Important: Async/Await still uses Promises under the hood - an async function always returns a Promise."


5. How to improve UI performance if application is performing slow?

Answer:

"If my application is performing slowly, I would approach it systematically by identifying the bottleneck first, then applying appropriate optimization techniques.

Step 1: Identify the Problem

Performance Profiling:

  • Use Chrome DevTools Performance tab to record and analyze
  • Check Lighthouse audit for performance score
  • Measure using Performance API: performance.now()

Step 2: Common Performance Issues & Solutions

A. JavaScript Execution Issues

1. Heavy Computations Blocking Main Thread

// Problem: Blocking operation
function processLargeData(data) {
  // Heavy calculation blocks UI
  return data.map(item => complexCalculation(item));
}

// Solution 1: Use Web Workers
const worker = new Worker('worker.js');
worker.postMessage(data);
worker.onmessage = (e) => {
  const result = e.data;
};

// Solution 2: Break into chunks with setTimeout
function processInChunks(data, chunkSize = 100) {
  let index = 0;
  
  function processChunk() {
    const chunk = data.slice(index, index + chunkSize);
    chunk.forEach(item => processItem(item));
    
    index += chunkSize;
    
    if (index < data.length) {
      setTimeout(processChunk, 0); // Give UI time to breathe
    }
  }
  
  processChunk();
}

2. Unnecessary Re-renders (React)

// Problem: Component re-renders on every parent update
function UserList({ users, theme }) {
  return users.map(user => <UserCard user={user} />);
}

// Solution: Use React.memo
const UserCard = React.memo(({ user }) => {
  return <div>{user.name}</div>;
});

// Solution: Use useMemo for expensive calculations
const sortedUsers = useMemo(() => {
  return users.sort((a, b) => a.name.localeCompare(b.name));
}, [users]);

3. Memory Leaks

// Problem: Event listeners not cleaned up
useEffect(() => {
  window.addEventListener('scroll', handleScroll);
  // Missing cleanup
}, []);

// Solution: Clean up properly
useEffect(() => {
  window.addEventListener('scroll', handleScroll);
  
  return () => {
    window.removeEventListener('scroll', handleScroll); // Cleanup
  };
}, []);

B. Network & Resource Loading

1. Too Many HTTP Requests

// Problem: Loading all data at once
fetch('/api/products') // 10,000 products

// Solution: Implement pagination
fetch('/api/products?page=1&limit=20')

// Solution: Lazy loading
const ProductImage = ({ src }) => {
  return <img loading="lazy" src={src} />;
};

2. Large Bundle Size

// Problem: Importing entire library
import _ from 'lodash'; // Entire library

// Solution: Import only what you need
import debounce from 'lodash/debounce'; // Just one function

// Solution: Code splitting
const AdminPanel = lazy(() => import('./AdminPanel'));

3. Unoptimized Images

<!-- Problem: Large image files -->
<img src="photo.jpg" /> <!-- 5MB image -->

<!-- Solution: Use optimized formats -->
<img src="photo.webp" width="300" height="200" />

<!-- Solution: Responsive images -->
<img 
  srcset="small.jpg 300w, medium.jpg 600w, large.jpg 1200w"
  sizes="(max-width: 600px) 300px, 600px"
/>

C. DOM Manipulation

1. Excessive DOM Updates

// Problem: Multiple DOM updates
for (let i = 0; i < 1000; i++) {
  const div = document.createElement('div');
  div.textContent = i;
  document.body.appendChild(div); // Reflow each time
}

// Solution: Batch DOM updates
const fragment = document.createDocumentFragment();
for (let i = 0; i < 1000; i++) {
  const div = document.createElement('div');
  div.textContent = i;
  fragment.appendChild(div);
}
document.body.appendChild(fragment); // Single reflow

2. Lack of Virtualization for Large Lists

// Problem: Rendering 10,000 items
{items.map(item => <ListItem item={item} />)}

// Solution: Use virtual scrolling (react-window)
import { FixedSizeList } from 'react-window';

<FixedSizeList
  height={500}
  itemCount={items.length}
  itemSize={50}
>
  {({ index, style }) => (
    <div style={style}>{items[index].name}</div>
  )}
</FixedSizeList>

D. Debouncing & Throttling

Problem: Too many function calls

// Problem: Search on every keystroke
<input onChange={(e) => searchAPI(e.target.value)} />

// Solution: Debounce (wait for pause in typing)
const debouncedSearch = debounce((value) => {
  searchAPI(value);
}, 300);

<input onChange={(e) => debouncedSearch(e.target.value)} />

// Solution: Throttle (limit frequency)
const throttledScroll = throttle(() => {
  checkScrollPosition();
}, 200);

window.addEventListener('scroll', throttledScroll);

Performance Optimization Checklist:

Frontend:

  • [ ] Minimize JavaScript bundle size (code splitting)
  • [ ] Implement lazy loading for routes and images
  • [ ] Use React.memo / useMemo / useCallback appropriately
  • [ ] Debounce/throttle event handlers
  • [ ] Virtualize long lists
  • [ ] Optimize images (WebP, proper sizing)
  • [ ] Remove unused code (tree shaking)
  • [ ] Cache API responses
  • [ ] Use service workers for offline support

Network:

  • [ ] Enable gzip/brotli compression
  • [ ] Use CDN for static assets
  • [ ] Implement HTTP/2 or HTTP/3
  • [ ] Add caching headers
  • [ ] Minimize API calls (pagination, infinite scroll)
  • [ ] Prefetch critical resources

In an interview, I would say: 'First, I'd use Chrome DevTools to identify the bottleneck - whether it's JavaScript execution, network requests, or rendering. Then I'd apply targeted optimizations like code splitting, lazy loading, memoization, or debouncing based on the specific issue.'"


6. Factors Responsible for UI Performance & Debugging Techniques

Answer:

A. Factors Responsible for UI Performance

"UI performance is affected by several factors:

1. JavaScript Execution Time

  • Problem: Heavy computations block the main thread
  • Impact: UI becomes unresponsive, animations stutter
  • Example: Processing large datasets, complex calculations

2. Rendering & Painting

  • Problem: Frequent DOM changes cause reflows and repaints
  • Impact: Janky animations, slow scrolling
  • Example: Animating properties that trigger layout (width, height)

3. Network Latency

  • Problem: Slow API responses, large resource downloads
  • Impact: Long loading times, delayed interactions
  • Example: Unoptimized images, too many HTTP requests

4. Memory Leaks

  • Problem: Unused memory not garbage collected
  • Impact: Application slows down over time, crashes
  • Example: Event listeners not removed, unclosed connections

5. Bundle Size

  • Problem: Large JavaScript files take time to download and parse
  • Impact: Slow initial page load
  • Example: Including entire libraries instead of specific functions

6. Inefficient Re-renders (React/Vue/Angular)

  • Problem: Components re-render unnecessarily
  • Impact: Wasted computation, slow updates
  • Example: Not using memoization, improper state management

B. Debugging Techniques

When I'm stuck on a performance issue, here's my systematic approach:

1. Chrome DevTools - Performance Tab

How I use it:

1. Open DevTools (F12)
2. Go to Performance tab
3. Click Record button
4. Perform the slow action
5. Stop recording
6. Analyze the flame graph

What I look for:

  • Long tasks (yellow/red blocks) - JavaScript blocking main thread
  • Layout/Reflow (purple) - DOM changes causing recalculation
  • Rendering (green) - Paint and composite operations
  • Network requests - Slow or too many requests

Example finding:

If I see a long yellow block labeled 'processData()',
I know that function is blocking the UI.
Solution: Break it into chunks or use Web Worker.

2. Console Timing

Measure specific operations:

// Measure function execution time
console.time('dataProcessing');
processLargeDataset(data);
console.timeEnd('dataProcessing');
// Output: dataProcessing: 2341ms

// Measure render time
const startTime = performance.now();
renderComponent();
const endTime = performance.now();
console.log(`Render took ${endTime - startTime}ms`);

3. React DevTools Profiler

For React applications:

1. Install React DevTools extension
2. Open Profiler tab
3. Click record
4. Interact with app
5. Stop and analyze which components re-rendered and why

What I check:

  • Components that re-render frequently
  • Components with long render times
  • Unnecessary renders (props didn't change)

4. Network Tab Analysis

Check for network bottlenecks:

1. Open Network tab
2. Reload page or trigger action
3. Look for:
   - Large file sizes (>500KB)
   - Slow requests (>1s)
   - Too many requests (>50)
   - Requests blocking others (waterfall)

Common issues I find:

  • Unoptimized images (5MB instead of 50KB)
  • API calls made in loops (N+1 problem)
  • Missing caching headers

5. Memory Profiler

Detect memory leaks:

1. Go to Memory tab
2. Take heap snapshot
3. Interact with app (add/remove components)
4. Take another snapshot
5. Compare snapshots
6. Look for objects that should be garbage collected but aren't

Red flags:

  • Memory consistently increasing
  • Event listeners piling up
  • Detached DOM nodes

6. Lighthouse Audit

Quick performance check:

1. Open DevTools
2. Go to Lighthouse tab
3. Select Performance
4. Generate report
5. Review recommendations

Gives scores for:

  • First Contentful Paint (FCP)
  • Largest Contentful Paint (LCP)
  • Total Blocking Time (TBT)
  • Cumulative Layout Shift (CLS)

7. Console Logging Strategy

Strategic debugging:

// Problem: Don't know why component re-renders
function MyComponent({ data, config }) {
  console.log('MyComponent rendered');
  console.log('Data:', data);
  console.log('Config:', config);
  
  useEffect(() => {
    console.log('Effect ran - data changed');
  }, [data]);
  
  return <div>...</div>;
}

8. Browser's Source Tab - Breakpoints

Step-by-step debugging:

1. Go to Sources tab
2. Find the problematic file
3. Set breakpoint (click line number)
4. Trigger the action
5. Execution pauses at breakpoint
6. Inspect variables, step through code

Types of breakpoints I use:

  • Line breakpoints - Stop at specific line
  • Conditional breakpoints - Stop only if condition true
  • Event listener breakpoints - Stop when event fires
  • Exception breakpoints - Stop when error thrown

9. Using debugger Statement

Quick debugging in code:

function calculateTotal(items) {
  let total = 0;
  
  debugger; // Execution pauses here
  
  items.forEach(item => {
    total += item.price;
  });
  
  return total;
}

10. Third-Party Performance Tools

When built-in tools aren't enough:

  • Sentry - Error tracking and performance monitoring
  • New Relic - Application performance monitoring
  • WebPageTest - Detailed performance analysis
  • Bundle Analyzer - Visualize bundle size

My Debugging Workflow (Step-by-Step)

When I encounter a bug or performance issue:

  1. Reproduce the issue consistently
    • Know the exact steps to trigger it
  2. Identify the scope
    • Is it frontend, backend, or network?
    • Use Network tab to check API responses
  3. Use appropriate tool
    • Performance issue → Performance Profiler
    • Logic bug → Console logging + Breakpoints
    • Memory issue → Memory Profiler
    • Rendering issue → React DevTools Profiler
  4. Isolate the problem
    • Comment out code sections
    • Binary search approach (disable half, see if issue persists)
  5. Form hypothesis
    • Based on data, guess the cause
  6. Test hypothesis
    • Make targeted change, see if it fixes issue
  7. Verify fix
    • Test in different browsers
    • Check edge cases
    • Measure performance improvement

Example Debugging Session:

Problem: 'Search is slow when typing'

// Step 1: Measure
console.time('search');
searchProducts(query);
console.timeEnd('search');
// Output: search: 1842ms (Too slow!)

// Step 2: Check what's happening
function searchProducts(query) {
  console.log('Search called with:', query); // Logs on every keystroke!
  fetch(`/api/search?q=${query}`)
    .then(response => response.json())
    .then(data => setResults(data));
}

// Step 3: Solution identified - too many API calls
// Apply debouncing
const debouncedSearch = debounce(searchProducts, 300);

In an interview, I would say: 'When debugging, I start by reproducing the issue, then use Chrome DevTools Performance tab to identify the bottleneck. If it's JavaScript execution, I use breakpoints and console logging. For rendering issues, I use React DevTools Profiler. For network issues, I check the Network tab. The key is using the right tool for the specific problem.'"

Tuesday, September 30, 2025

Http vs websocket

# HTTP vs WebSockets - Complete Interview Guide

## Simple Explanation for Interviews:

"HTTP and WebSockets are two different ways for a browser to communicate with a server. The main difference is that HTTP closes the connection after each request, while WebSockets keep the connection open for continuous two-way communication."

---

## 1. HTTP (Hypertext Transfer Protocol)

### What is HTTP?
HTTP is a **request-response protocol** where the client asks for something and the server responds, then the connection closes.

### How HTTP Works:

**Step-by-Step:**
1. Client (Browser) sends a request to the server
2. Server processes the request
3. Server sends back the response (data)
4. **Connection closes immediately** ❌

**Analogy:** Like sending a letter through postal mail:
- You write a letter (request)
- Send it to someone
- They read it and write back (response)
- Communication ends
- To ask another question, you need to send a new letter

### Key Characteristics:

| Feature | Description |
|---------|-------------|
| **Connection Type** | Short-lived, closes after each request-response |
| **Communication** | One-way at a time (request → response) |
| **Who Initiates** | Always the client (browser) |
| **State** | Stateless (each request is independent) |
| **Connection Overhead** | High (new connection for every request) |

### When to Use HTTP:

✅ **Good for:**
- Loading web pages
- Fetching product details (e-commerce)
- Downloading files
- RESTful APIs
- Any operation that doesn't need real-time updates

### Example Use Case:

**Shopping on Amazon:**
```
User clicks on a product
   ↓
Browser sends HTTP request: "Give me details of Product #123"
   ↓
Server responds with product data (name, price, images)
   ↓
Connection closes ❌
   ↓
User clicks "Add to Cart"
   ↓
New HTTP connection opens
   ↓
Request: "Add Product #123 to cart"
   ↓
Response: "Item added successfully"
   ↓
Connection closes ❌
```

### Why HTTP is NOT Good for Chat Apps:

**Problem:** If WhatsApp used HTTP for messaging:
- You send: "Hello" → New connection opens → Message sent → Connection closes
- Friend sends: "Hi" → New connection opens → Message received → Connection closes
- You send: "How are you?" → New connection opens → Message sent → Connection closes
- Friend sends: "I'm good" → New connection opens → Message received → Connection closes

**Issues:**
- Creating new connections for EVERY message is slow
- High latency (delay) between messages
- Wastes bandwidth
- Server resources exhausted
- Not real-time experience

---

## 2. WebSockets

### What is WebSockets?
WebSockets is a protocol that creates a **persistent, two-way communication channel** between client and server.

### How WebSockets Works:

**Step-by-Step:**
1. Client sends initial HTTP request to "upgrade" to WebSocket
2. Server accepts and upgrades the connection
3. **Connection stays open** ✅
4. Both client and server can send data anytime
5. Connection stays open until explicitly closed

**Analogy:** Like a phone call:
- You dial and connect once
- Then you can talk back and forth continuously
- Both people can speak anytime
- No need to hang up and call again for each sentence
- Connection stays until you decide to end the call

### Key Characteristics:

| Feature | Description |
|---------|-------------|
| **Connection Type** | Long-lived, persistent connection |
| **Communication** | Full-duplex (both directions simultaneously) |
| **Who Initiates** | After initial handshake, both can send data anytime |
| **State** | Stateful (connection maintains context) |
| **Connection Overhead** | Low (single connection for entire session) |
| **Latency** | Very low (no connection setup delay) |

### When to Use WebSockets:

✅ **Good for:**
- Real-time chat applications (WhatsApp, Slack)
- Live notifications
- Collaborative editing (Google Docs)
- Online multiplayer games
- Live sports scores
- Stock trading platforms
- Live streaming dashboards

### Example Use Case:

**WhatsApp Chat:**
```
User opens WhatsApp
   ↓
WebSocket connection established ✅
   ↓
Connection stays open (like a phone call)
   ↓
You type: "Hello" → Sent instantly through open connection
   ↓
Friend types: "Hi" → Received instantly through same connection
   ↓
You type: "How are you?" → Sent instantly
   ↓
Friend types: "Good!" → Received instantly
   ↓
... continuous back-and-forth communication ...
   ↓
Connection stays open until you close the app
```

---

## Side-by-Side Comparison

| Aspect | HTTP | WebSockets |
|--------|------|------------|
| **Connection** | Closes after each request | Stays open continuously |
| **Communication Direction** | Request → Response only | Both directions anytime |
| **Speed** | Slower (new connection each time) | Faster (persistent connection) |
| **Real-time** | Not suitable | Perfect for real-time |
| **Overhead** | High (connection setup repeatedly) | Low (one-time setup) |
| **Data Push** | Server can't push without request | Server can push anytime |
| **Use Case** | Static content, traditional web pages | Live updates, chat, games |

---

## Visual Representation

### HTTP Flow:
```
Client Server
  | |
  |------- Request 1 --------> |
  |<------ Response 1 -------- |
  | ❌ Connection closes |
  | |
  |------- Request 2 --------> |
  |<------ Response 2 -------- |
  | ❌ Connection closes |
  | |
  |------- Request 3 --------> |
  |<------ Response 3 -------- |
  | ❌ Connection closes |
```

### WebSocket Flow:
```
Client Server
  | |
  |---- Handshake (HTTP) ----> |
  |<--- Upgrade to WebSocket-- |
  | ✅ Connection established |
  | |
  |======== Message 1 ========> |
  |<======= Message 2 ========= |
  |======== Message 3 ========> |
  |<======= Message 4 ========= |
  |======== Message 5 ========> |
  | |
  | ✅ Connection stays open |
  | (continuous two-way flow) |
```

---

## How to Explain in Interview

### Question: "What's the difference between HTTP and WebSockets?"

**Good Answer Structure:**

**1. Start with the core difference:**
"HTTP is a request-response protocol where the connection closes after each exchange, while WebSockets maintain a persistent, two-way connection that stays open."

**2. Provide practical context:**
"For example, when you browse a website like Amazon and click on a product, your browser makes an HTTP request, gets the product details back, and the connection closes. That's fine for static content."

**3. Explain WebSocket advantage:**
"But for real-time applications like WhatsApp, you need instant two-way communication. With WebSockets, the connection opens once and stays open, allowing both the client and server to send messages anytime without the overhead of creating new connections."

**4. Mention use cases:**
"We use HTTP for traditional web pages, REST APIs, and fetching data. We use WebSockets for chat apps, live notifications, collaborative tools like Google Docs, online games, and any application needing real-time updates."

---

## Common Interview Follow-ups

### Q: "Can't we use HTTP for real-time applications?"

**Answer:** "Technically yes, but it's inefficient. You'd need to use techniques like:
- **Polling:** Client repeatedly asks 'Any new messages?' every few seconds (wastes resources)
- **Long Polling:** Client asks and server holds the request until there's data (better but still inefficient)

WebSockets solve this elegantly with a persistent connection, eliminating the overhead and providing true real-time communication."

### Q: "When would you choose HTTP over WebSockets?"

**Answer:** "HTTP is better when:
- You don't need real-time updates
- Communication is request-driven (user clicks, then gets data)
- You want simpler implementation (WebSockets are more complex)
- You're building traditional web pages or REST APIs
- You want better compatibility with proxies and firewalls

WebSockets add complexity, so use them only when you need real-time, bidirectional communication."

### Q: "What's the initial handshake in WebSockets?"

**Answer:** "WebSockets start with an HTTP request that includes an 'Upgrade' header asking the server to switch from HTTP to WebSocket protocol. If the server agrees, it responds with status 101 (Switching Protocols), and the connection is upgraded to WebSocket. From that point, it's a persistent WebSocket connection, no longer HTTP."

---

## Key Takeaways for Interview

1. **HTTP = Like sending letters** (open → send → receive → close → repeat)
2. **WebSockets = Like a phone call** (connect once → continuous conversation)
3. **HTTP for static/request-based** content
4. **WebSockets for real-time/bidirectional** communication
5. **Know the use cases:** E-commerce uses HTTP, Chat apps use WebSockets
6. **Understand the overhead:** HTTP reconnects each time (slow), WebSockets stay connected (fast)

Remember: Choose the right tool for the job. Don't use WebSockets for everything just because they're "better" for real-time—use HTTP for normal web requests and WebSockets specifically for real-time needs.

Thursday, September 25, 2025

PROMISES


 // Simulated API: Fetch user data

function fetchUserData(userId) {
  return new Promise((resolve) => {
    setTimeout(() => {
      resolve({ id: userId, name: "Alice" });
    }, 500);
  });
}
// Simulated API: Fetch posts by user
function fetchUserPosts(userId) {
  return new Promise((resolve) => {
    setTimeout(() => {
      resolve([
        { id: 1, title: "First Post" },
        { id: 2, title: "Second Post" }
      ]);
    }, 500);
  });
}
// Simulated API: Fetch comments for a post
function fetchPostComments(postId) {
  return new Promise((resolve) => {
    setTimeout(() => {
      resolve([
        { id: 101, text: "Nice post!" },
        { id: 102, text: "Thanks for sharing." }
      ]);
    }, 500);
  });
}

// 🔗 Chained Promises Example
function chainWithPromises() {
  console.log('🔗 Chaining promises...');

  fetchUserData(123)
    .then(user => {
      console.log('👤 User:', user);
      return fetchUserPosts(user.id);
    })
    .then(posts => {
      console.log('📝 Posts:', posts);
      if (posts.length === 0) {
        throw new Error('No posts found for user');
      }
      return fetchPostComments(posts[0].id);
    })
    .then(comments => {
      console.log('💬 Comments:', comments);
    })
    .catch(error => {
      console.error('❌ Error in chain:', error.message);
    })
    .finally(() => {
      console.log('✅ Chain completed');
    });
}
 
// Run both examples
chainWithPromises();

output:


// 🔄 Async/Await Flow
async function chainWithPromises(userId) {
  try {
  console.log('🔗 Chaining promises...');
    const user = await fetchUserData(userId);
    console.log("👤 User:", user);
   // console.log("📄 Fetching posts...");
    const posts = await fetchUserPosts(user.id);
    console.log("📝 Posts:", posts);
    if (posts.length === 0) throw new Error("No posts found");
   // console.log("💬 Fetching comments...");
    const comments = await fetchPostComments(posts[0].id);
    console.log("💬 Comments:", comments);
  } catch (error) {
    console.error("❌ Error:", error.message);
  } finally {
      console.log('✅ Chain completed');
  }
}

// Run the flow
chainWithPromises(123);


Sunday, July 13, 2025

Quiz JS

1.Hoisting: 

 -----------2-----------2-----------2-----------2-----------2-----------2-----------2-----------2-----------2--------


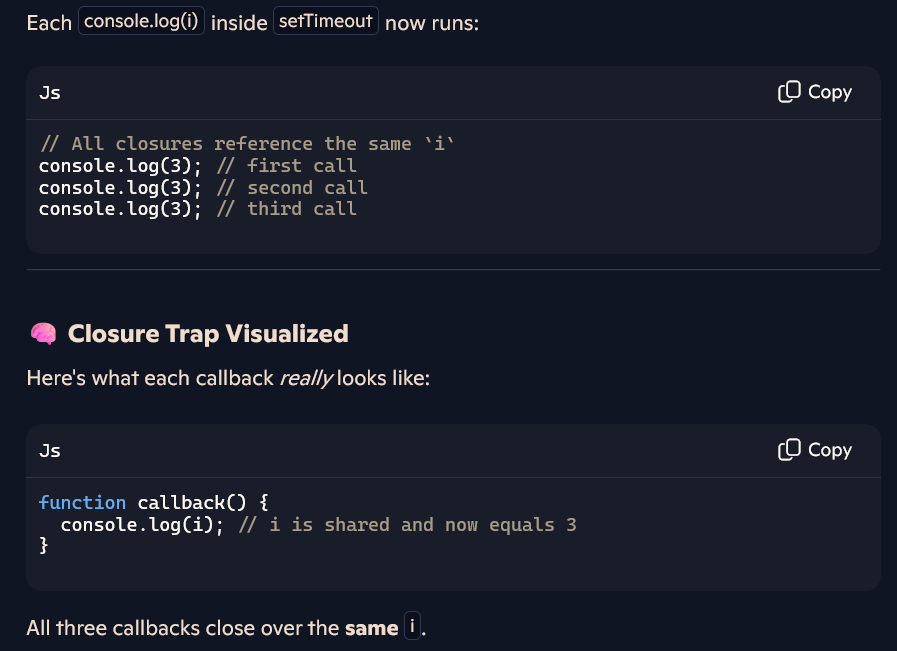
🔹 Using var:

  • var is function scoped, so inside the loop, each iteration shares the same i
  • setTimeout is asynchronous, so the loop finishes before any of the callbacks run
  • By the time the callbacks execute, i is already 3
  • That’s why 3 is printed three times

🔹 Using let:

  • let is block scoped, meaning each loop iteration creates a fresh binding of i
  • Each setTimeout captures the current value of i
  • So it prints 0, 1, 2 — as expected

var behaves differently from let, as it doesn't create a new variable for each loop iteration.”

var i is function-scoped

               Output: You might expect it to log: 0, 1, 2
                             But instead, it prints: 3, 3, 3

With let, each iteration gets a new block-scoped i
               Output:
                So each arrow function captures a distinct copy of i (0, then 1, then 2)


   Why 3 Output instead 2:
    iteration 1: callback delays at this time i =0,
    iteration 2: callback delays at this time i =1
    iteration 3: callback scheduled  at this time i =2 and executed after this so it is iterated again 3


FINAL:


-------3--------3-----------3------------3---------3-------------3-------------3------------3----------

📘 console.log()

  • Purpose: General-purpose logging
  • Usage: For debugging, tracking values, or displaying routine messages

console.warn()

  • Purpose: Signals a warning or potential issue
  • Usage: Highlight deprecated code, suspect logic, or cautionary flags


--------4----------4---------4------------4----------4----------4-----------4-


-------5-------5----------5----------5----------5


----6-----6----6--------6-----------6------------6-------------6----------6----------6-------6----

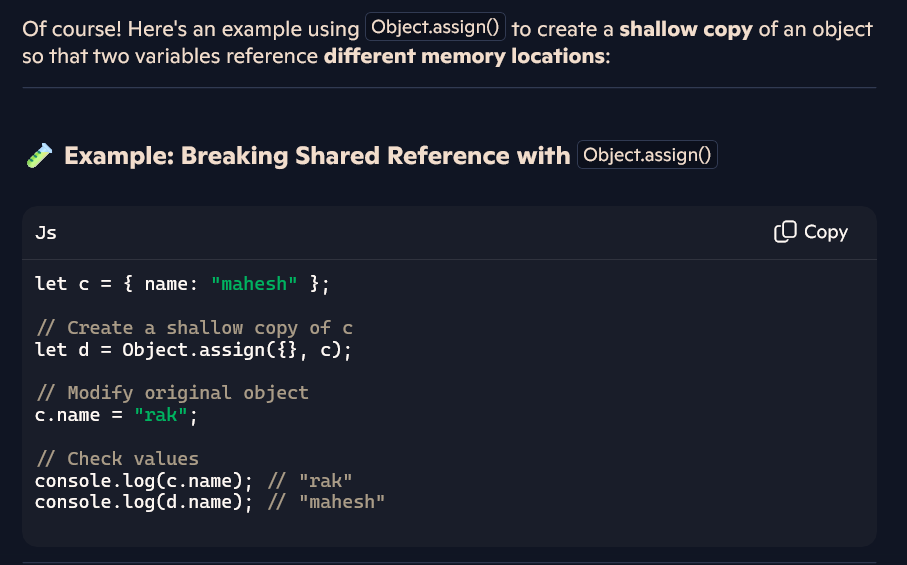
1.Allocation to same memory and 2. Allocation to different memory with object.assign

Both c and d point to the same object in memory, which means any change to one reflects in the other.
You're not copying the contents of c into d. You're just copying the reference  

Want to explore how to break that shared reference and create a copy instead? You can do it with spread syntax, Object.assign(), or deep cloning techniques. Say the word!


above images for deep copy(json.strigfyy) and shallow copy(obj.assign)


------7------7---------7--------7--------7----------7------------7--------7------------7

<script>
       var x;
       let x=12;
   console.log(x)
</script/>


---8----8----8


---9---9---9---99--


10---10---10---10----10


check difference above and below iamge
here below name default keyword 
to understand difference 


Tuesday, May 20, 2025

react

A React.js Tech Lead interview will go beyond basic React questions and delve into architectural decisions, performance optimization, state management at scale, team leadership, and a deep understanding of the broader web ecosystem. Here's a comprehensive breakdown of what to expect and how to prepare:
I. Technical Depth (React.js Specifics)
A. Core React Concepts (Advanced)
 * Virtual DOM and Reconciliation:
   * Deep dive: How does React's reconciliation algorithm work? When does it re-render? What are the common pitfalls that lead to unnecessary re-renders?
   * How do shouldComponentUpdate, React.memo, useMemo, and useCallback prevent re-renders, and when would you use each?
 * Hooks (Deep Understanding & Custom Hooks):
   * Explain the mental model behind useState, useEffect, useContext, useReducer, useRef, useImperativeHandle, useLayoutEffect, useDebugValue.
   * When would you create a custom Hook? Provide examples of complex scenarios where a custom Hook would be beneficial (e.g., managing form state, authentication, data fetching).
   * How do you ensure custom Hooks are reusable and testable?
 * Context API:
   * When is Context API a good choice for state management, and when might it be overused?
   * Discuss potential performance implications of Context API and how to mitigate them (e.g., splitting contexts, memoization).
 * Component Composition & Patterns:
   * Higher-Order Components (HOCs) vs. Render Props vs. Hooks: Discuss the pros and cons of each pattern for code reuse and cross-cutting concerns. When would you choose one over the others?
   * Compound Components: Explain the pattern and its benefits for creating flexible and cohesive UI elements.
   * Controlled vs. Uncontrolled Components: Explain the differences, use cases, and how to manage them effectively.
 * Error Boundaries:
   * How do you implement error boundaries in React? What problems do they solve?
   * What are their limitations?
 * Portals:
   * When would you use React Portals? Provide real-world examples.
B. Performance Optimization
 * Identifying Bottlenecks:
   * How do you profile React application performance? (React DevTools Profiler, Lighthouse, Web Vitals).
   * What are common performance anti-patterns in React?
 * Optimization Techniques:
   * Code Splitting and Lazy Loading: Explain React.lazy and Suspense. How do you implement dynamic imports at the component and route level?
   * List Virtualization (Windowing): When is it necessary, and what libraries (e.g., react-window, react-virtualized) would you use?
   * Image Optimization: Strategies for optimizing images (compression, lazy loading, responsive images).
   * Throttling and Debouncing: Explain these concepts and their application in React (e.g., for search inputs, scroll events).
   * Server-Side Rendering (SSR) / Static Site Generation (SSG): Discuss the benefits (SEO, initial load time) and drawbacks. When would you choose Next.js or Gatsby?
   * Web Workers: How can Web Workers offload heavy computations from the main thread in a React app?
C. State Management at Scale
 * Choosing a State Management Solution:
   * Beyond Context API, discuss popular global state management libraries (Redux, Zustand, Recoil, Jotai, MobX).
   * Deep dive into Redux: Explain Redux principles (single source of truth, immutable state, pure reducers), middleware (Thunk, Saga), selectors (Reselect). When is Redux overkill?
   * Compare and contrast different libraries based on complexity, performance, learning curve, and use cases.
   * How do you manage complex asynchronous operations with state?
 * Data Fetching & Caching:
   * Discuss popular data fetching libraries (React Query/TanStack Query, SWR, Apollo Client).
   * Explain the benefits of client-side caching and automatic re-fetching.
   * How do you handle loading states, error states, and optimistic UI updates?
D. Testing Strategies
 * Types of Testing:
   * Unit Testing: Tools (Jest, React Testing Library). How do you write effective unit tests for React components (behavior-driven testing)?
   * Integration Testing: How do you test the interaction between components and with external APIs?
   * End-to-End Testing: Tools (Cypress, Playwright). When is E2E testing most valuable?
 * Test Best Practices:
   * What does "test the user's perspective" mean in React testing?
   * How do you mock API calls and other dependencies in tests?
   * Strategies for maintaining a robust and fast test suite in a large application.
II. Architectural & Design Skills
 * Application Structure and Folder Organization:
   * Discuss different approaches (e.g., feature-based, type-based, atomic design). What are the pros and cons of each?
   * How do you decide on a scalable and maintainable folder structure for a large React application?
 * Design Patterns:
   * Familiarity with common software design patterns (e.g., MVC, MVVM, Observer, Singleton) and how they might apply (or not apply) to React.
   * How do you enforce consistency and best practices across a large codebase? (Linters, Prettier, architectural guidelines).
 * Scalability and Maintainability:
   * How do you design a React application to be scalable for a growing team and increasing complexity?
   * Strategies for refactoring large React components or features.
   * Dealing with technical debt.
 * Monorepos:
   * If applicable, discuss experience with monorepos (Lerna, Nx) for managing multiple React applications or shared libraries.
 * Component Libraries and Design Systems:
   * Experience in building and maintaining internal component libraries.
   * Integrating with external design systems (e.g., Material UI, Ant Design).
   * Ensuring consistency and reusability.
III. Leadership & Team Management
 * Mentorship and Code Review:
   * How do you provide constructive feedback during code reviews?
   * Strategies for mentoring junior developers and fostering their growth.
   * How do you establish and enforce coding standards and best practices within a team?
 * Technical Vision & Strategy:
   * How do you contribute to the technical roadmap for the frontend team?
   * How do you evaluate new technologies and decide whether to adopt them?
   * Experience with technology migrations or large-scale refactors.
 * Project Management & Collaboration:
   * Experience working in Agile/Scrum environments.
   * Estimating effort for frontend tasks.
   * Collaborating with product managers, designers, and backend teams.
   * Managing conflicts or disagreements within the team.
 * Communication:
   * Ability to clearly articulate complex technical concepts to both technical and non-technical stakeholders.
   * Leading technical discussions and driving decisions.
IV. System Design (Frontend Focus)
 * Design a scalable React application for a given use case. (e.g., an e-commerce platform, a social media feed, a real-time dashboard).
   * Consider: component breakdown, state management, data flow, API integration, error handling, authentication, performance, scalability, and testing.
   * Discuss choices for routing, build tools, and deployment strategies.
 * How would you handle internationalization (i18n) and accessibility (a11y) in a large React application?
 * Security considerations in a React frontend application. (XSS, CSRF, input sanitization, secure API calls).
 * Observability and Monitoring: How do you monitor the health and performance of your React application in production? (e.g., Sentry, New Relic, custom logging).
V. Broader Web Ecosystem & Trends
 * Build Tools:
   * Deep understanding of Webpack, Rollup, Vite.
   * How do they work, and how do you optimize their configuration for production?
 * TypeScript:
   * Strong proficiency in TypeScript.
   * How do you leverage TypeScript for better code quality, maintainability, and developer experience in a large React project?
 * CI/CD for Frontend:
   * Familiarity with setting up and maintaining CI/CD pipelines for React applications (e.g., Jenkins, GitLab CI, GitHub Actions, Netlify).
   * Automated testing, linting, bundling, deployment.
 * Latest React Features & Future Trends:
   * Knowledge of recent React versions and features (e.g., Concurrent Mode, Server Components, Server Actions).
   * Understanding the direction of React development and potential future trends (e.g., WebAssembly, AI in development).
Preparation Tips:
 * Review Core Concepts: Don't just know what something is, know why it's used and how it works under the hood.
 * Practice System Design: Work through various frontend system design problems. Think about trade-offs and justify your decisions.
 * Real-World Experience: Be ready to discuss specific projects, challenges you faced, and how you solved them. Quantify your impact where possible.
 * Open Source & Contributions: If you have open-source contributions or personal projects, be prepared to discuss the technical decisions made.
 * Stay Updated: Keep up with the latest React news, RFCs, and popular libraries.
 * Communication is Key: Articulate your thoughts clearly and concisely. If you don't know something, be honest and explain your thought process for how you would approach finding the answer.
Good luck with your interview!

Wednesday, March 5, 2025

javascript xyz


Promises, Async, and Await
promise is an object representing eventual completion or failure of an asynchronous operation.
async & await
async functions are the functions that returns promise, async function uses await  keyword inside them.
await keywords used inside the async function to pause the execution until the promise is resolved or rejected.
async makes a function return a Promise
await makes a function wait for a Promise
async function fetchData() {

    let promise = new Promise((resolve, reject) => {
        setTimeout(() => {
            console.log("resolved");
            resolve("Data received"); // Resolving the promise
        }, 1000);
    });

    try {
        let data = await promise; // Awaiting the previously created promise
        console.log(data); // "Data received"
    } catch (error) {
        console.error(error); // Handles any errors
    }
}
fetchData();


Thursday, February 27, 2025

Reactjs Document - x imp


Roadmap React flowchart QA

Advanced React JS Concepts: A Deep Dive

The Basics of React JS

Before we explore the advanced concepts, let's quickly revisit the basics of React JS.

Components and JSX

React applications are built using components. Components are like building blocks that encapsulate the logic and the UI of a part of the application. They can be reusable and allow developers to create complex user interfaces by composing smaller components together.

In React, JSX (JavaScript XML) is used to describe the structure of components. It provides a syntax that looks similar to HTML, making it easier for developers to visualize the UI components.

State and Props

In React, state and props are used to manage data within components.

State: It represents the local state of a component and can be changed over time. When the state updates, React will automatically re-render the component to reflect the changes.

Props: Short for "properties," props are used to pass data from a parent component to a child component. Props are read-only and cannot be changed by the child component.

Virtual DOM

React uses a virtual DOM to optimize the rendering process. The virtual DOM is a lightweight copy of the actual DOM, and any changes made to the UI are first done on the virtual DOM. React then calculates the difference between the previous and updated virtual DOMs and efficiently updates only the necessary parts of the actual DOM, reducing rendering time.

Advanced React JS Concepts

Now that we have covered the basics let's dive into some advanced concepts that can enhance your React JS skills.

React Hooks

Introduced in React 16.8, React Hooks are functions that allow developers to use state and other React features without writing a class. Hooks, such as useState and useEffect, enable functional components to have stateful logic and side effects.

Hooks make code more concise and readable, and they provide an elegant solution for managing state in functional components.

Context API

The Context API is a way to share data across the component tree without explicitly passing props at every level. It allows developers to create a global state that can be accessed by any component within the tree.

Using the Context API eliminates the need for "prop drilling," making the data flow more efficient and organized.

React Router

React Router is a popular library used for handling navigation in React applications. It allows developers to create multiple routes, enabling users to navigate between different pages or views in a single-page application.

With React Router, developers can implement dynamic and client-side routing, providing a seamless user experience.

Error Boundaries

Error Boundaries are a feature in React that helps catch errors that occur during rendering, in lifecycle methods, and in the constructors of the whole component tree. By using Error Boundaries, developers can prevent the entire application from crashing when an error occurs in a specific component.

Error Boundaries improve the overall stability of the application and provide better error handling.

React Performance Optimization

As React applications grow in complexity, performance optimization becomes crucial. Let's explore some techniques for optimizing React applications.

Memoization

Memoization is a technique used to optimize expensive calculations or functions by caching the results. In React, the useMemo hook can be used to memoize the result of a function and recompute it only if the dependencies change.

By memorizing calculations, React can avoid unnecessary recalculations and improve rendering performance.

Lazy Loading

Lazy loading is a method used to defer the loading of non-essential resources until they are needed. In React, components can be lazy-loaded using the React.lazy function and Suspense component.

Lazy loading reduces the initial bundle size, resulting in faster load times for the initial page.

Code Splitting

Code splitting involves breaking down the application's code into smaller chunks or bundles, which are loaded on demand. This technique reduces the initial loading time of the application.

React applications can benefit from code splitting, especially when dealing with large codebases.

Debouncing and Throttling

Debouncing and throttling are techniques used to control the rate at which a function is called. Debouncing delays the execution of a function until a specified time has passed since the last time it was invoked. Throttling limits the number of times a function can be called over a certain period.

By using these techniques, developers can improve performance by reducing unnecessary function calls.

React Testing

Testing is a crucial aspect of software development. In React, testing can be done at different levels.

Unit Testing With Jest

Jest is a popular testing framework that is widely used for unit testing React components. It allows developers to write test cases to ensure that individual components behave as expected.

Unit testing helps identify and fix bugs early in the development process.

Integration Testing With React Testing Library

The React Testing Library provides utilities for testing React components in a more realistic way by simulating user interactions.

Integration testing ensures that different components work together as intended and helps validate the application's overall functionality.

React Best Practices

Following best practices is essential for writing maintainable and scalable React applications.

Folder Structure

A well-organized folder structure can make a significant difference in the development process. Grouping related components, styles, and utilities together makes it easier to locate and update code.

DRY Principle (Don't Repeat Yourself)

The DRY principle advocates for avoiding code duplication. In React, developers should strive to reuse components and logic whenever possible.

Stateless Functional Components

Stateless functional components, also known as functional or presentational components, are a recommended best practice in React. These components do not maintain state and only receive data through props. By using stateless functional components, the code becomes more modular and easier to test.

Using PropTypes

PropTypes is a library that helps in type-checking the props passed to components. By specifying the expected data types and whether certain props are required, developers can catch bugs and ensure that components receive the correct data.

Advanced Styling in React

Styling is an essential aspect of creating appealing user interfaces. React offers various methods for styling components.

CSS Modules

CSS Modules allow developers to write modular and scoped CSS in their components. The CSS rules defined within a component only apply to that specific component, preventing unintended styling conflicts.

CSS Modules enhance code maintainability and make it easier to manage styles in larger applications.

Styled Components

Styled Components is a popular library that enables developers to write CSS directly within their JavaScript code. It uses tagged template literals to create styled-components.

Styled Components offer a more dynamic and flexible approach to styling, making it easy to manage component styles based on props and states.

React State Management

As React applications grow in complexity, managing state across multiple components becomes challenging. State management libraries can help address this issue.

Redux

Redux is a predictable state management library that follows the Flux architecture. It centralizes the application's state in a single store and allows components to access and modify the state using reducers and actions.

Redux provides a clear separation of concerns and simplifies data flow in large applications.

MobX

MobX is another popular state management library that offers a more flexible and reactive approach to managing state. It automatically tracks the dependencies between observables and updates components when the state changes.

MobX is known for its simplicity and ease of integration with React applications.

Server-Side Rendering (SSR) With React

Server-Side Rendering is a technique used to render a React application on the server before sending it to the client. This improves initial loading times and enhances SEO by providing search engines with fully rendered HTML content.

SSR can be achieved using libraries like Next.js, which simplifies the process of implementing server-side rendering in React applications.

React Security Best Practices

Web application security is of utmost importance to protect user data and prevent attacks. React developers should follow these best practices:

XSS Prevention

Cross-Site Scripting (XSS) is a common security vulnerability that allows attackers to inject malicious scripts into web pages. Developers can prevent XSS attacks by properly sanitizing user input and using libraries like DOMPurify to sanitize HTML.

CSRF Protection

Cross-Site Request Forgery (CSRF) is another security threat that involves an attacker tricking users into unknowingly performing actions on a website. To protect against CSRF attacks, developers should use CSRF tokens and enforce strict CORS policies.

The Future of React

React continues to evolve, and its future looks promising. Some trends and developments to watch for include:

React Concurrent Mode: Concurrent Mode is an upcoming feature that will allow React to perform rendering in a more incremental and interruptible way. This will result in smoother user experiences, especially for applications with complex UIs.

React Server Components: Server Components aim to take server-side rendering to the next level. They will allow developers to offload component rendering to the server, leading to even faster load times.

Improved React Performance: The React team is continually working on optimizing React's performance, making it faster and more efficient.

Conclusion

React JS is a powerful and versatile library that enables developers to build sophisticated web applications. In this article, we explored some advanced concepts in React, including React Hooks, Context API, React Router, performance optimization, testing, state management, and more.

By mastering these advanced concepts and following best practices, developers can create scalable, maintainable, and high-performing React applications that deliver exceptional user experiences

---------------------------------------------------------------------------------------------------------------------------------------------------------------------------

Reactive Programming in React With RxJS

Learn to manage asynchronous data in React by integrating RxJS for cleaner code, efficient API handling, and enhanced performance through reactive programming.


ReactJS has become a go-to library for building dynamic and responsive user interfaces. However, as applications grow, managing asynchronous data streams becomes more challenging. Enter RxJS, a powerful library for reactive programming using observables. RxJS operators simplify handling complex asynchronous data flows, making your React components more manageable and efficient.

In this article, we'll explore RxJS operators within the context of ReactJS. We'll walk through step-by-step examples, demonstrating how to integrate RxJS into your React applications. By the end of this guide, you'll have a solid understanding of RxJS operators and how they can enhance your ReactJS projects.

What Is RxJS?

RxJS, or Reactive Extensions for JavaScript, is a library that allows you to work with asynchronous data streams using observables. An observable is a collection that arrives over time, enabling you to react to changes in data efficiently.

But why use RxJS in ReactJS? ReactJS is inherently stateful and deals with UI rendering. Incorporating RxJS allows you to handle complex asynchronous operations like API calls, event handling, and state management with greater ease and predictability.

Why Should You Use RxJS in ReactJS?

Improved Asynchronous Handling

In ReactJS, handling asynchronous operations like API calls or user events can become cumbersome. RxJS operators like map, filter, and debounceTime allow you to manage these operations elegantly, transforming data streams as they flow through your application.

Cleaner and More Readable Code

RxJS promotes a functional programming approach, making your code more declarative. Instead of managing state changes and side effects manually, you can leverage RxJS operators to handle these tasks concisely.

Enhanced Error Handling

RxJS provides powerful error-handling mechanisms, allowing you to gracefully manage errors in your asynchronous operations. Operators like catchError and retry can automatically recover from errors without cluttering your code with try-catch blocks.

Setting Up RxJS in a ReactJS Project

Before diving into the code, let's set up a basic ReactJS project with RxJS installed.

JavaScript


Once you have RxJS installed, you're ready to start integrating it into your React components.

Step-by-Step Example

Let's walk through a detailed example of using RxJS in a ReactJS application. We'll create a simple app that fetches data from an API and displays it in a list. We'll use RxJS operators to handle the asynchronous data stream efficiently.

Step 1: Creating a Simple React Component

First, create a new component called DataFetcher.js:

JavaScript


This component initializes state variables for data and error. It renders a list of data fetched from an API and handles errors gracefully.

Step 2: Importing RxJS and Creating an Observable

Next, we'll import RxJS and create an observable for fetching data. In the same DataFetcher.js file, modify the component to include the following:

JavaScript


Here, we use the ajax.getJSON method from RxJS to fetch data from an API. The map operator transforms the response, and catchError handles any errors, returning an observable that we can subscribe to.

Step 3: Subscribing to the Observable in useEffect

Now, we'll use the useEffect hook to subscribe to the observable and update the component state accordingly:

JavaScript


This code subscribes to the fetchData observable. If the observable emits an error, it updates the error state; otherwise, it updates the data state. The subscription is cleaned up when the component unmounts to prevent memory leaks.

Step 4: Enhancing the Data Fetching Process

Now that we have a basic implementation, let's enhance it using more RxJS operators. For example, we can add a loading state and debounce the API calls to optimize performance.

JavaScript


In this enhanced version, debounceTime ensures that the API call is only made after 500ms of inactivity, reducing unnecessary requests. The tap operator sets the loading state before and after the API call, providing visual feedback to the user.

Common RxJS Operators and Their Usage in ReactJS

RxJS offers a wide range of operators that can be incredibly useful in ReactJS applications. Here are a few common operators and how they can be used:

map

The map operator transforms each value emitted by an observable. In ReactJS, it can be used to format data before rendering it in the UI.

JavaScript


filter

The filter operator allows you to filter out values that don't meet certain criteria. This is useful for displaying only relevant data to the user.

JavaScript


debounceTime

debounceTime delays the emission of values from an observable, making it ideal for handling user input events like search queries.

JavaScript


switchMap

switchMap is perfect for handling scenarios where only the latest result of an observable matters, such as autocomplete suggestions.

JavaScript


Advanced RxJS and ReactJS Integration: Leveraging More Operators and Patterns

Combining Observables With merge

Sometimes, you need to handle multiple asynchronous streams simultaneously. The merge operator allows you to combine multiple observables into a single observable, emitting values from each as they arrive.

JavaScript


In a React app, you can use merge to simultaneously listen to multiple events or API calls and handle them in a unified manner.

Real-Time Data Streams With interval and scan

For applications requiring real-time updates, such as stock tickers or live dashboards, RxJS can create and process streams effectively.

JavaScript


In this example, scan acts like a reducer, maintaining a cumulative state across emissions.

Advanced User Input Handling With combineLatest

For complex forms or scenarios where multiple input fields interact, the combineLatest operator is invaluable.

JavaScript


This example listens to multiple input fields and emits the latest values together, simplifying form state management.

Retry Logic With retryWhen and delay

In scenarios where network reliability is an issue, RxJS can help implement retry mechanisms with exponential backoff.

JavaScript


This approach retries the API call up to three times, with a delay between attempts, improving user experience during transient failures.

Loading Indicators With startWith

To provide a seamless user experience, you can show a loading indicator until data is available by using the startWith operator.

JavaScript


This ensures the UI displays a placeholder or spinner until data is loaded.

Cancelable Requests With takeUntil

Handling cleanup of asynchronous operations is critical, especially for search or dynamic queries. The takeUntil operator helps cancel observables.

JavaScript


Here, takeUntil ensures that any ongoing API calls are canceled when a new query is entered, or the component unmounts.

FAQs

What Is the Difference Between RxJS and Redux?

RxJS focuses on managing asynchronous data streams using observables, while Redux is a state management library. RxJS can be used with Redux to handle complex async logic, but they serve different purposes.

Can I Use RxJS With Functional Components?

Yes, RxJS works seamlessly with React's functional components. You can use hooks like useEffect to subscribe to observables and manage side effects.

Is RxJS Overkill for Small React Projects?

For small projects, RxJS might seem like overkill. However, as your project grows and you need to handle complex asynchronous data flows, RxJS can simplify your code and make it more maintainable.

How Do I Debug RxJS in ReactJS?

Debugging RxJS code can be done using tools like the Redux DevTools or RxJS-specific logging operators like tap to inspect emitted values at various stages.

How Do I Optimize for High-Frequency Events?

Operators like throttleTime and auditTime are ideal for handling high-frequency events like scrolling or resizing.

Can RxJS Replace React State Management Libraries?

RxJS is not a state management solution but can complement libraries like Redux for handling complex async logic. For smaller projects, RxJS with BehaviorSubject can sometimes replace state management libraries.

What Are Best Practices for RxJS in ReactJS?

  • Use takeUntil for cleanup in useEffect to avoid memory leaks.
  • Avoid overusing RxJS for simple synchronous state updates; prefer React's built-in tools for that.
  • Test observables independently to ensure reliability.

Conclusion

RxJS is a powerful tool for managing asynchronous data in ReactJS applications. Using RxJS operators, you can write cleaner, more efficient, and maintainable code. Understanding and applying RxJS in your ReactJS projects will significantly enhance your ability to handle complex asynchronous data flows, making your applications more scalable.